I should *so* be in bed right now. It's almost 1am (early for me, that's what you're thinking.... I can see it in your eyes!) but tomorrow Ardyn and I have a come and go bridal shower in the morning for my "soon-to-be" sister-in-law Bekah. STBSIL. Did you get that? I am excited about it. We should have a great time. What's really cool about Bekah? Well, I have known her since she was a wee little girl. In fact, she was in my sister's class. She used to spend the night at our house every New Year's Eve. And her birthday is New Year's Day. Cool. She will be an excellent aunt. She keeps Evan's brother in line. I love her and the kids love her ;) We are blessed.
I bought a dress to wear. Well, actually, my Kohl's Cash bought a dress. I am this strange size between a misses XL and a Women's 1X. Basically, my boobs require a 1X in some cases, but then the 1X is generally too large everywhere else. This is a stretchy silky dress, and it has a belt at empire level. Really the dress is a bit too big, but since the breast area is sufficient, I figured I can work with it. In fact, the belt is an elastic 80's style belt. Wide with a metal clasp in the front. And I had to take 6" off the belt to even get it to fit without stretching it at all. Who MAKES these clothes? I am not skinny. But I sure feel like I am when I have to take all that off a belt. So basically because I can sew, I just cut the belt off the clasp and will sew it back on. it's all ready to go. But I can't bring myself to sew it. I need to put the black thread on the machine, and sit down, and run a quick stitch to tack it into place. And I am too lazy. I will curse myself at 9am when I am late. But it's a come and go shower. But I would rather be there the whole time to take pictures. We got a little gift from Ardyn for Bekah. Ardyn is her flower girl. I can't wait for Ardyn to give it to her, because Ardyn decorated the paper herself with markers. It's cute. At least I think so.
I have lots of worthwhile things to say, but I also just realized that in addition to cleaning off my bed BEFORE I can sleep, I also have to make a card for each of the gifts and sew that belt and be at the shower by 9am. Shit. Probably not going to happen. *sigh*
Goodnight!

Showing posts with label Sewing. Show all posts
Showing posts with label Sewing. Show all posts
Saturday, August 14, 2010


Sunday, July 18, 2010
Jo-Ann and Rapping Hamsters...
Jo-Ann Fabrics TWO days in a row? I must be crazy, right?! Well, it just so happens that it's coupon commotion week, and I thought it would be SILLY to be right there in the same town again and not STOP and use a coupon. Actually, I ended up being able to use like SIX coupons, which was AWESOME. Ardyn and I had been looking at fleece with the intention of making little fall jackets for her and Marek. I have the pattern but I had it at HOME because when we went to Jo-Ann yesterday it was completely unexpected and on a whim.
So today because we KNEW we had to go pick up the door at Menard's, we went ahead and took it with. I'm going to use "The Little Hooded Jacket" Pattern by Favorite Little Things. We picked a girly jolly roger fleece for the outside of her jacket. It is black and white with gray striping and hot pink hearts. We picked a winter camouflage fleece for Marek's outer. I strategically did that because they both have the gray, which meant that I could get the inner sweatshirt fleece for each jacket all in one cut, which meant that I could use my coupon on it, because it was full priced at $12.99 a yard (YIKES!) Luckily little clothes take little fabric amounts! haha. I got a hot pink and white polka dot for the trim on Ardyn's and some Jolly Roger fabric for trim on Marek's. They each got a sport weight zipper in black, and I am excited to get started. HOWEVER the house is such a disaster right now that really I think tomorrow will be more of the same picking up :) It's making me feel disorganized. We've been running so much that I can't wait to just STAY here. Chances are we will be in our pajamas.
I am very happy that my Nikon lens is back from warranty work. I feel whole again. LOL.
I had to get a new hard drive (external) last week because my current one is full. I still haven't copied things over to the new one yet. My intention is to put the older one in a safe deposit box or something to keep all the photos somewhere else in case of fire. Thinking of Fire reminds me that I need to update my LifeDoc Binders, and in doing so, I should write another review of my newest binder, which I am WAY behind on. I've always wanted to keep them ready, so in the event of some natural disaster, I would have a copy of everything that we could need in the event of an emergency. I did great until just after Ardyn was born, and I don't think it was updated since. Oy.
Somedays I just think I would be better off packing things up or donating them so there was just less STUFF around here. I wish that I didn't depend so much on STUFF.
I am wondering... do you think I can embroider 5 onesies by hand by Thursday? Hmmm. Or better worded, WILL I embroider them? I got some plain colored ones as a baby shower gift and am thinking about embroidering them myself as part of the gift. Would that be silly? Sometimes I don't know if people would be like *What is this crap?* and so I want to make sure that would be at least "semi-appropriate."
OMG I freaking love this commercial! WATCH IT!
It could ONLY be better if it were the Beastie Boys. LOL. I ADORE it!
Okay, seriously now. Haha. I think I am just gonna let my fishville fish all die. I've got better shit to do.
I think I'd better watch the nanny and read over my jacket pattern and directions in case I get a chance to sew tomorrow ;)
So today because we KNEW we had to go pick up the door at Menard's, we went ahead and took it with. I'm going to use "The Little Hooded Jacket" Pattern by Favorite Little Things. We picked a girly jolly roger fleece for the outside of her jacket. It is black and white with gray striping and hot pink hearts. We picked a winter camouflage fleece for Marek's outer. I strategically did that because they both have the gray, which meant that I could get the inner sweatshirt fleece for each jacket all in one cut, which meant that I could use my coupon on it, because it was full priced at $12.99 a yard (YIKES!) Luckily little clothes take little fabric amounts! haha. I got a hot pink and white polka dot for the trim on Ardyn's and some Jolly Roger fabric for trim on Marek's. They each got a sport weight zipper in black, and I am excited to get started. HOWEVER the house is such a disaster right now that really I think tomorrow will be more of the same picking up :) It's making me feel disorganized. We've been running so much that I can't wait to just STAY here. Chances are we will be in our pajamas.
I am very happy that my Nikon lens is back from warranty work. I feel whole again. LOL.
I had to get a new hard drive (external) last week because my current one is full. I still haven't copied things over to the new one yet. My intention is to put the older one in a safe deposit box or something to keep all the photos somewhere else in case of fire. Thinking of Fire reminds me that I need to update my LifeDoc Binders, and in doing so, I should write another review of my newest binder, which I am WAY behind on. I've always wanted to keep them ready, so in the event of some natural disaster, I would have a copy of everything that we could need in the event of an emergency. I did great until just after Ardyn was born, and I don't think it was updated since. Oy.
Somedays I just think I would be better off packing things up or donating them so there was just less STUFF around here. I wish that I didn't depend so much on STUFF.
I am wondering... do you think I can embroider 5 onesies by hand by Thursday? Hmmm. Or better worded, WILL I embroider them? I got some plain colored ones as a baby shower gift and am thinking about embroidering them myself as part of the gift. Would that be silly? Sometimes I don't know if people would be like *What is this crap?* and so I want to make sure that would be at least "semi-appropriate."
OMG I freaking love this commercial! WATCH IT!
It could ONLY be better if it were the Beastie Boys. LOL. I ADORE it!
Okay, seriously now. Haha. I think I am just gonna let my fishville fish all die. I've got better shit to do.
I think I'd better watch the nanny and read over my jacket pattern and directions in case I get a chance to sew tomorrow ;)
Monday, June 21, 2010
Review: Sprightly Soaker Pattern by Little Comet Tails
Today I finally got out my Sprightly Soaker Pattern. I absolutely LOVE Little Comet Tails Patterns, for their fit, their ease of sewing, the fact that the pattern is actually PAPER instead of the tissue/pattern paper crap that I always tear (especially when I use it alot with pins!) and because every one I have used has fit my kids (both of them- and they are built SO differently!) exceptionally well. The mamma that runs the show over there is also very nice, and I have purchased home sew labels from her, which I can attach to the items that I sew for my kids, and add size tags also. This eliminates a lot of guesswork as to which ones are which, and whose are whose, and it's important when you have more than one in diapers.
I have made both the Little Comet Tails Stellar Transitions Trainers, and the Little Comet Tails Crescent Moon Yoga Pants (although I don't do the crescent bum, but the standard pants variation) The ONLY downside I have found to any of the patterns, is that I personally MUST have an internal soaker in the wetzone for any covers I have out of fleece, and the pattern does not include a cutout or suggestion for a soaker. However, with a little creativity and common sense, it's quite simple to fashion something. (for me that is) and I think that if you have sewing ability or experience, you could get along easy enough.
For the pants, I have also converted them to board shorties and also added leg bands for contrast (my own design) and I add an internal pant soaker that is sewn in just at the waistband and allows for extra protection to prevent compression wicking (sitting on grandma's lap, buckled in the carseat or stroller) and also makes them suitable for naptime and nighttime over a good fitted.
For the Sprightly soaker, I cut out a soaker that is in the traditional curved hourglass shape, and used a stretch zig-zag stitch to attach it permanently to the wet-zone of the soaker body BEFORE sewing anything else. These steps are so easy that I have to say it would be a simple and amazing addition to her regular Little Comet Tails Patterns.
When I bought the sprightly soaker, I have to admit I was wary. I have made soakers in the past, and to be quite honest, I really suck at them. For some reason, the leg bands give me LOTS of problems. In fact, I won't even sew a newborn or small soaker for that exact reason. The legband opening is sooooo tiny that it frustrates me and is difficult to stretch and serge while catching all three layers. I long ago gave up on serging them, and started to just sew them. I was still having issues here and there, and so I pretty much purchased all my soakers after that. I had preferred the fit of a Inspiration Cover, especially those made by Michelle at the Pea Chic Nest. But after Ardyn, I had some Gender Neutral covers left, but usually the kids fit different sizes in opposite seasons, so all those cute boyish longies won't do me a bit of good in the summer. And then, because I loved those covers so much, I kinda left her in a medium for too long and stretched them out, so they don't have their original shape anymore.
Of course, Marek's bum seems just as, if not more sensitive than Ardyn's, so I have him in wool and fleece as often as possible and now most definitely at night time in the summer. Even with the air on... because the kid sleeps for 10-12 hours consistently overnight, and I hate the red raw bum that comes from tooooo long in PUL covers or PUL Pockets.
So when I saw this pattern, and had been delighted in just how well her other patterns have worked for me, I thought "why not?"
And then I didn't get to it. FOREVER. I have have the fleece sitting there and today I was inspired when I saw Natures Fabrics post some new instock interlocks on their facebook page. Why oh Why had I never considered sewing my own interlock covers? Seriously? They cost a fortune! I love babyology covers (but I buy them from Canada to get them cheaper), and I have two for Marek right now for nighttime, but I had never once considered sewing my own interlock. Perhaps that's because I had so many problems getting a good fit with previous soaker patterns (Katrina's Soaker Pattern must be made for someone else's kids, or someone else's DIAPER?!) and I had been so frustrated with leg bands in soakers that I just gave up. Why would I ever consider screwing up a cover made of EXPENSIVE interlock wool fabric if I couldn't even get a cheap fleece one right?
Well, I thought I had better give this another try.
I had a hard time deciding on size. Marek can still wear the board shorties and pants in a size Medium, but with a bulky fitted, I am thinking it would be wiser to get him in a large.... except that he is SO skinny and long, that he might not be able to keep them up. So I traced and cut out a medium, and fashioned a medium hourglass soaker, and got to sewing.
Now, I am not going to lie. The legbands were making me cranky. For a moment, I thought WHY am I DOING this to myself again. But the pattern was pretty cool. The legbands are more narrow than any I have made before (which means you have less room to screw up by serging and re-serging while trying to catch all three layers) But I have to say that it actually worked out well enough that I made an entire soaker on the serger (a new serger makes a whole lot of difference - especially since I went from a $200 Singer "nicknamed Satan" to a $1200 Janome model) with the exception of zig zag stitching the soaker in.
When I finished, I finally saw a soaker that looked like UNDERWEAR! In fact, I could get it (the same Medium fleece soaker) on the 30 pound 2 year old (not in a diaper) and think I will try making her something that might work for her as panties or even as an overnight cover, although I will try a large for her.
I was in awe that a fleece soaker could be so TRIM. It's beautiful and it looks GREAT on the skinny lil man. Now, I did decide that while it fits well over a prefold, it would be a stretch over a goodmama fitted. SO I have decided to upsize to a large for him.... for room to grow and room for bulkier fitteds. He kept smiling when I put it on him.... and walking around all goofy and proud. Too cute. Now I have two more to make for him and try to perfect the soaker legs and be confident that I can sew some out of interlock.... because you just don't want to mess up $25 a yard fabric!
I have made both the Little Comet Tails Stellar Transitions Trainers, and the Little Comet Tails Crescent Moon Yoga Pants (although I don't do the crescent bum, but the standard pants variation) The ONLY downside I have found to any of the patterns, is that I personally MUST have an internal soaker in the wetzone for any covers I have out of fleece, and the pattern does not include a cutout or suggestion for a soaker. However, with a little creativity and common sense, it's quite simple to fashion something. (for me that is) and I think that if you have sewing ability or experience, you could get along easy enough.
For the pants, I have also converted them to board shorties and also added leg bands for contrast (my own design) and I add an internal pant soaker that is sewn in just at the waistband and allows for extra protection to prevent compression wicking (sitting on grandma's lap, buckled in the carseat or stroller) and also makes them suitable for naptime and nighttime over a good fitted.
For the Sprightly soaker, I cut out a soaker that is in the traditional curved hourglass shape, and used a stretch zig-zag stitch to attach it permanently to the wet-zone of the soaker body BEFORE sewing anything else. These steps are so easy that I have to say it would be a simple and amazing addition to her regular Little Comet Tails Patterns.
When I bought the sprightly soaker, I have to admit I was wary. I have made soakers in the past, and to be quite honest, I really suck at them. For some reason, the leg bands give me LOTS of problems. In fact, I won't even sew a newborn or small soaker for that exact reason. The legband opening is sooooo tiny that it frustrates me and is difficult to stretch and serge while catching all three layers. I long ago gave up on serging them, and started to just sew them. I was still having issues here and there, and so I pretty much purchased all my soakers after that. I had preferred the fit of a Inspiration Cover, especially those made by Michelle at the Pea Chic Nest. But after Ardyn, I had some Gender Neutral covers left, but usually the kids fit different sizes in opposite seasons, so all those cute boyish longies won't do me a bit of good in the summer. And then, because I loved those covers so much, I kinda left her in a medium for too long and stretched them out, so they don't have their original shape anymore.
Of course, Marek's bum seems just as, if not more sensitive than Ardyn's, so I have him in wool and fleece as often as possible and now most definitely at night time in the summer. Even with the air on... because the kid sleeps for 10-12 hours consistently overnight, and I hate the red raw bum that comes from tooooo long in PUL covers or PUL Pockets.
So when I saw this pattern, and had been delighted in just how well her other patterns have worked for me, I thought "why not?"
And then I didn't get to it. FOREVER. I have have the fleece sitting there and today I was inspired when I saw Natures Fabrics post some new instock interlocks on their facebook page. Why oh Why had I never considered sewing my own interlock covers? Seriously? They cost a fortune! I love babyology covers (but I buy them from Canada to get them cheaper), and I have two for Marek right now for nighttime, but I had never once considered sewing my own interlock. Perhaps that's because I had so many problems getting a good fit with previous soaker patterns (Katrina's Soaker Pattern must be made for someone else's kids, or someone else's DIAPER?!) and I had been so frustrated with leg bands in soakers that I just gave up. Why would I ever consider screwing up a cover made of EXPENSIVE interlock wool fabric if I couldn't even get a cheap fleece one right?
Well, I thought I had better give this another try.
I had a hard time deciding on size. Marek can still wear the board shorties and pants in a size Medium, but with a bulky fitted, I am thinking it would be wiser to get him in a large.... except that he is SO skinny and long, that he might not be able to keep them up. So I traced and cut out a medium, and fashioned a medium hourglass soaker, and got to sewing.
Now, I am not going to lie. The legbands were making me cranky. For a moment, I thought WHY am I DOING this to myself again. But the pattern was pretty cool. The legbands are more narrow than any I have made before (which means you have less room to screw up by serging and re-serging while trying to catch all three layers) But I have to say that it actually worked out well enough that I made an entire soaker on the serger (a new serger makes a whole lot of difference - especially since I went from a $200 Singer "nicknamed Satan" to a $1200 Janome model) with the exception of zig zag stitching the soaker in.
When I finished, I finally saw a soaker that looked like UNDERWEAR! In fact, I could get it (the same Medium fleece soaker) on the 30 pound 2 year old (not in a diaper) and think I will try making her something that might work for her as panties or even as an overnight cover, although I will try a large for her.
I was in awe that a fleece soaker could be so TRIM. It's beautiful and it looks GREAT on the skinny lil man. Now, I did decide that while it fits well over a prefold, it would be a stretch over a goodmama fitted. SO I have decided to upsize to a large for him.... for room to grow and room for bulkier fitteds. He kept smiling when I put it on him.... and walking around all goofy and proud. Too cute. Now I have two more to make for him and try to perfect the soaker legs and be confident that I can sew some out of interlock.... because you just don't want to mess up $25 a yard fabric!


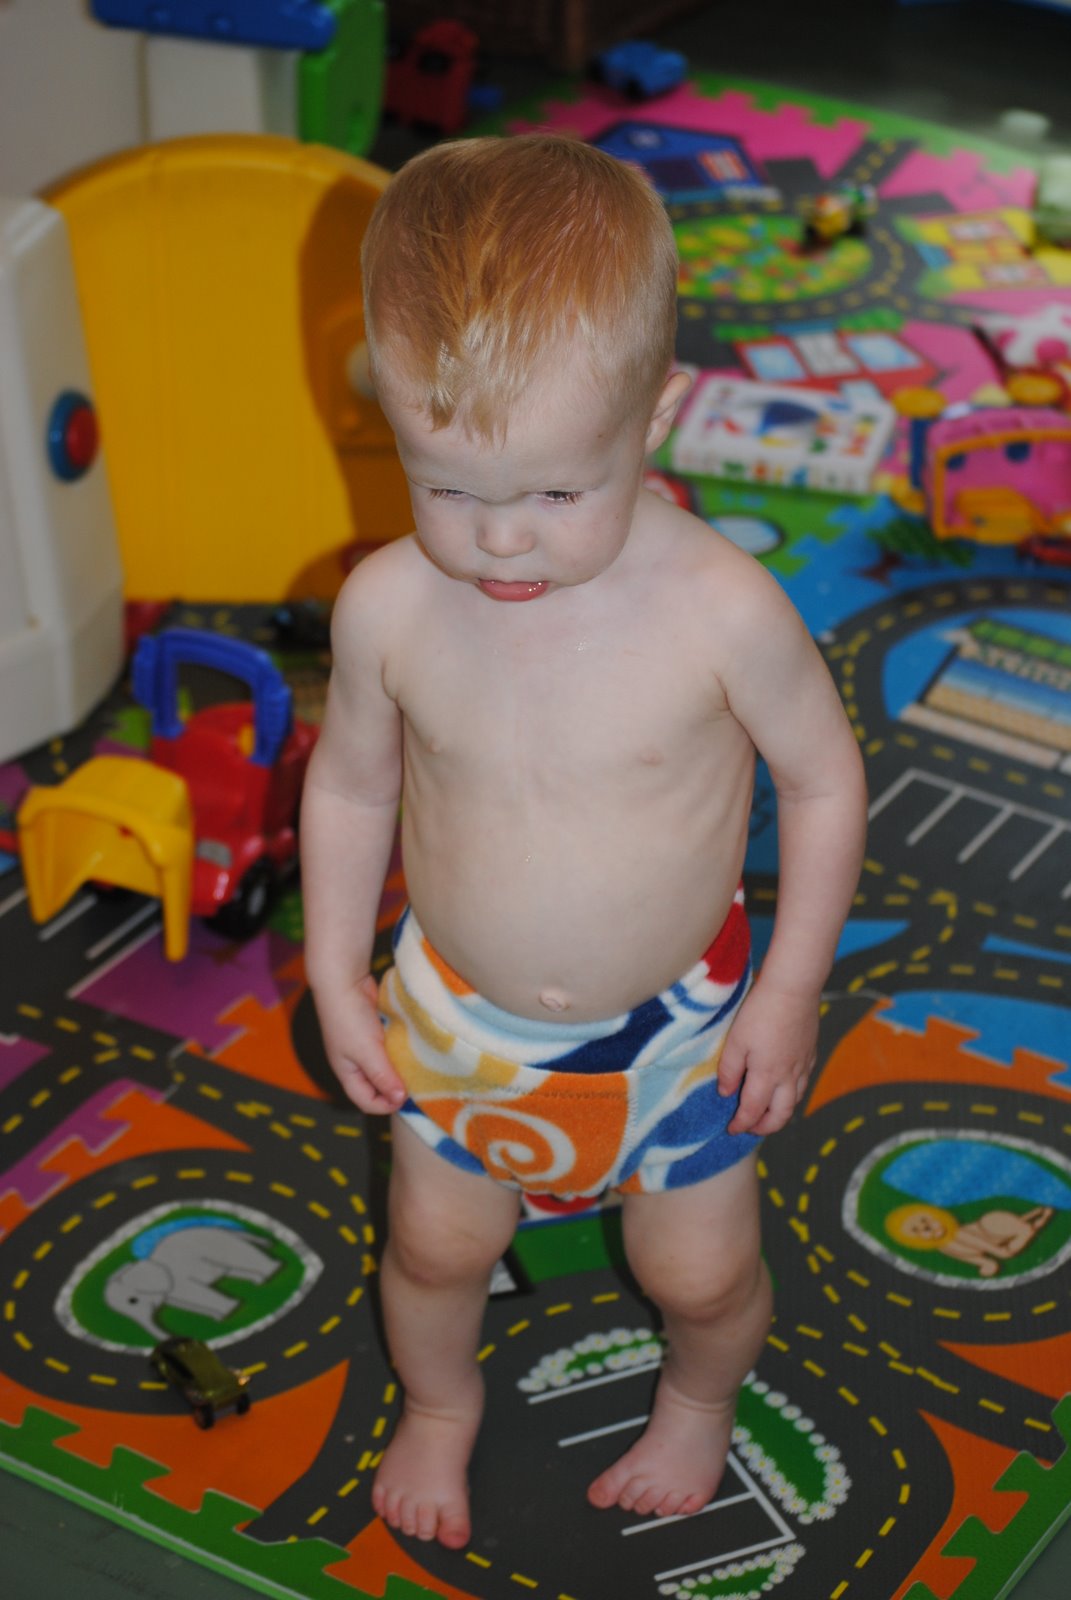

UPDATED: Made a Size Large. The second time around was much better and legs and waistband were even easier. The Large is a little baggier on him, but would fit well over a bulky or heavy wetter fitted, and gives him room to grow without being so large that it falls off. I adore it!


Wednesday, March 03, 2010
Quick and Funky Pillowcase (you have to see it to believe it!!)
Firstly, let me clarify that this is not my idea, was never my idea, and I have no idea what the "technical" name for it is. Someone showed it to me, another person told me it's been around for about 8 years, and I am just doing a photo tutorial because the directions I had been given were without "photos" and at one point told you to have both fabrics facing down, which made no sense to me, but since they were the DIRECTIONS I went ahead and listened against my gut instinct, and of course it came out wrong. Then I did what I "thought" was right and it came out perfectly! So I decided that although there might be a photo tutorial out there somewhere... I would just do one and spread the happiness that is a quick and funky pillowcase. Funky because even as you look at these pictures, you won't believe it. But if you do it, it will work- Trust me!
Here we go!
You need: 3/4 yard fabric (44" wide is best) for the "main body" of the pillowcase (mine is the unicorn print) - 1/4 yard for the fabric band at the edge (opening) of the pillowcase (mine is the yellow with multi-colored dots) - 1/8 yard accent fabric (this is the green strip in mine, and really is an optional and decorative piece.

Lay the 1/4 yard for the edge of pillowcase face up. (see photo below) This piece should measure roughly 9" x 44" long. Cut the accent piece (the 1/8 yard piece) to measure 1.5" x 44"- then fold it in half lengthwise with the WRONG SIDES TOGETHER (pattern facing out) and iron it. It will now measure 3/4" x 44".
Now, take the accent piece, and lay it on TOP of the 1/4 yard piece. make sure that the two raw edges of the accent piece are matched up with the raw edge of one side of the edge (polka dot) piece, and that the fold of the accent piece is facing "down" or towards you, as in my photo below. Now is a good time to baste these pieces together. This isn't a must, but it makes the next steps much easier, because this piece can easily shift and mess the whole plan up. So just trust me and go baste this together.

Okay, now that you have basted those together, lay that edge and accent piece together on the table again, with the accent piece facing up. The right sides of both fabrics should be showing and the basted edge should be facing up and away from you. Now lay the MAIN fabric piece (my unicorns) face down on top of the accent pieces. It's hard to tell from my pic, but mine is face down. Here you are going to match the raw edge of the main pillowcase body to the raw edges of your opening and accent pieces that you just basted. Here is a photo, and I have turned the corner back so you can see the right sides together (just for further clarification)

Okay, here is where it gets crazy and you are going to start to think I am nuts. Trust me. Take the bottom of the main fabric (right in front of your stomach if you are standing like I am taking the pics) and you start to ROLL it up. JUST the main fabric gets rolled/folded. Just start rolling. (see my pic) when you get to the point where you see the edge piece (my polka dots)you stop, and roll just one more time. Then your fabric should look JUST LIKE MINE below.

Let's get REALLY crazy. Now take that piece of fabric on the bottom (my polka dot piece) that just started to show as you were rolling, and fold it up OVER your entire roll of main fabric. (nuts, right?) and then carefully match ALL the raw edges and pin them together. You should have a sandwich of the pieces that were basted together, and then the raw edge of the main fabric (which was facedown) and the raw edge of the fabric (my polka dot) that peeked through under your roll and you just folded up. Now, once that is all pinned, you just need to be careful that you DON'T have any of the "roll" in the pinned area, and then you just run to your machine (this is a great time for a serger!!!) and sew a 1/4" seam along these raw, pinned edges. So you have this tube, with the roll inside, sewn on one edge, and the fabric is WRONG SIDES OUT. Some, pillowcase, eh?


Okay, now turn the tube right side out. You will suddenly have an "aha!" moment (most of us will!) and then you PRESS the pillowcase edge (my polka dot fabric) and you have this beautiful edge, with an accent piece, all lovely looking!

Okay, at this point I stopped following directions, because I was so excited that I just slapped it right sides together and serged each open edge and voila- pillowcase. But if you are more patient, or don't have a serger, these are the official directions (not my wording) to finish the pillowcase....
Trim Pillowcase to measure approximately 42 x 30.5 inches (Mine did not measure this, but I think that the lady at the fabric store might have been drunk and cut my fabric crooked so I didn't have quite what I was supposed to when I started)
Fold WRONG SIDES TOGETHER of pillowcase (this seems wrong to me, but I am just giving you the directions) and stitch a scant 1/4" seam along the long edge only.
Turn the pillowcase wrong side out and press seam. Now sew a generous 1/4" seam along the long edge (encasing the scant 1/4" seam) and along the bottom of the pillowcase. Zig Zag the raw edge of the bottom of the pillowcase. Turn, press, and enjoy!

Here we go!
You need: 3/4 yard fabric (44" wide is best) for the "main body" of the pillowcase (mine is the unicorn print) - 1/4 yard for the fabric band at the edge (opening) of the pillowcase (mine is the yellow with multi-colored dots) - 1/8 yard accent fabric (this is the green strip in mine, and really is an optional and decorative piece.

Now, take the accent piece, and lay it on TOP of the 1/4 yard piece. make sure that the two raw edges of the accent piece are matched up with the raw edge of one side of the edge (polka dot) piece, and that the fold of the accent piece is facing "down" or towards you, as in my photo below. Now is a good time to baste these pieces together. This isn't a must, but it makes the next steps much easier, because this piece can easily shift and mess the whole plan up. So just trust me and go baste this together.

Okay, now that you have basted those together, lay that edge and accent piece together on the table again, with the accent piece facing up. The right sides of both fabrics should be showing and the basted edge should be facing up and away from you. Now lay the MAIN fabric piece (my unicorns) face down on top of the accent pieces. It's hard to tell from my pic, but mine is face down. Here you are going to match the raw edge of the main pillowcase body to the raw edges of your opening and accent pieces that you just basted. Here is a photo, and I have turned the corner back so you can see the right sides together (just for further clarification)

Okay, here is where it gets crazy and you are going to start to think I am nuts. Trust me. Take the bottom of the main fabric (right in front of your stomach if you are standing like I am taking the pics) and you start to ROLL it up. JUST the main fabric gets rolled/folded. Just start rolling. (see my pic) when you get to the point where you see the edge piece (my polka dots)you stop, and roll just one more time. Then your fabric should look JUST LIKE MINE below.

Let's get REALLY crazy. Now take that piece of fabric on the bottom (my polka dot piece) that just started to show as you were rolling, and fold it up OVER your entire roll of main fabric. (nuts, right?) and then carefully match ALL the raw edges and pin them together. You should have a sandwich of the pieces that were basted together, and then the raw edge of the main fabric (which was facedown) and the raw edge of the fabric (my polka dot) that peeked through under your roll and you just folded up. Now, once that is all pinned, you just need to be careful that you DON'T have any of the "roll" in the pinned area, and then you just run to your machine (this is a great time for a serger!!!) and sew a 1/4" seam along these raw, pinned edges. So you have this tube, with the roll inside, sewn on one edge, and the fabric is WRONG SIDES OUT. Some, pillowcase, eh?


Okay, now turn the tube right side out. You will suddenly have an "aha!" moment (most of us will!) and then you PRESS the pillowcase edge (my polka dot fabric) and you have this beautiful edge, with an accent piece, all lovely looking!

Okay, at this point I stopped following directions, because I was so excited that I just slapped it right sides together and serged each open edge and voila- pillowcase.
 But if you are more patient, or don't have a serger, these are the official directions (not my wording) to finish the pillowcase....
Trim Pillowcase to measure approximately 42 x 30.5 inches (Mine did not measure this, but I think that the lady at the fabric store might have been drunk and cut my fabric crooked so I didn't have quite what I was supposed to when I started)
Fold WRONG SIDES TOGETHER of pillowcase (this seems wrong to me, but I am just giving you the directions) and stitch a scant 1/4" seam along the long edge only.
Turn the pillowcase wrong side out and press seam. Now sew a generous 1/4" seam along the long edge (encasing the scant 1/4" seam) and along the bottom of the pillowcase. Zig Zag the raw edge of the bottom of the pillowcase. Turn, press, and enjoy!

Friday, February 26, 2010
Sewing and Baking and Napping... oh my!
Those of you who are on facebook probably know what I have been up to, but since this blog has been around longer than facebook, I will just do my usual thing and sorry if you feel you're getting spammed, you know that you don't HAVE to read. LOL. For those of you who are my facebook friends, you may not be aware that when you see this as a "note" on facebook, it's simply being imported from my blog, Adventures in Everyday Life, and posted on facebook as a "note" because that's how facebook imports blogs. My blog address is www.adventuresineverydaylife.com and you can certainly feel free to visit there and see everything. I have been blogging since December 3rd, 2004- so over 5 years and about 1500 posts. I did very well writing on a daily basis, up until about the point I had kids. Then all hell broke loose.
So, what have we been up to lately? I could write all night. Let's see if I can hit a few high points and make some progress. Forgive me if I repeat myself.
I recently decided to grow my own sprouts. A recent article in Mary Jane's Farm magazine reminded me of the days when we used to grow sprouts at home, in mason jars with rubber bands and cheese cloth as strainers. I have always loved sprouts, especially on sandwiches and salads, and then there was the whole "sprout scare" that wasn't nearly as much of a "scare" as it was made out to be. I still bought sprouts, but they are so expensive, and really you can most trust freshness and quality when you grow them at home. I had kinda forgotten about it, and then this article talked about how Mary Jane recycles plastic vegetable cartons (think berries and strawberries from the store) to make portable and giftable sprouting trays. I just happened to have a stack of them around, and so I was intrigued. She recommended sproutpeople.com for organic and wonderful quality seeds and supplies, and I thought I would start some online research. When I stopped by sproutpeople.com, I was absolutely blown away by their selection, and their up front honesty and information about various mixes and supplies. I ordered a kid's sprouting kit, which was inexpensive and came with a really cute magnifying glass and a nice starter assortments of seeds, as well as a cool sprouter with two clear stackable trays, so you could really SEE the sprouts' progress. I decided that after my first batch, I would try to involve Ardyn and eventually Marek in the process. Ardyn is really starting to be a salad fan, and I know from experience that she is more likely to eat something that she has helped grow and/or prepare. After helping me chop veggies, she really did start eating them more frequently.
I also bought a Mother's Mix of seeds that includes delicious favorites that are high in folic acid and other nutrients, and also has fenugreek to support a healthy milk supply. (yay! how cool is THAT?!) And for good measure (and since they were inexpensive and I was already paying for shipping) I bought the assortment of stainless steel mesh lids for mason jars, so I could sprout the old fashioned way if I wanted to. They say that mason jars require more work to rinse, and I don't think the air circulation is as great in the jars, but at the same time, they are easier to shake and dance with for draining and straining than my trays. I don't like how once the sprouts start to "sprout" they start to clump and it's hard to get them separated in the trays. The directions for the sample bean mix told me to put the entire bag of beans into one of the clear trays. that seemed a little excessive to me, and I thought I would probably do better making half of them at a time (they would last me a long time) and I wasn't sure HOW they were possibly going to sprout being so cramped. So I divided the bag in half and put half in each tray. That worked better, but as they sprouted they still took up the whole tray. I think if it were up to me, for better air circulation and drainage, I would put even fewer in the tray at a time. But I was very pleased with the information that was sent with the kit, the directions, educational information on seeds and sprouting, and some really cool recipes and ways to prepare and enjoy each type of mix that I bought. I am so excited to try them. Here are some pics of the kit and my order, and then a pic of the first crop of sprouts from the Beanies Awesome Mix, which I tried first, mostly because they intrigued me (I have a new thing about beans, just ask me sometime!) and the recipe for eating it fried on top of rice or noodles, or making Beanies Awesome Sprouted Bean Burgers has me all excited!


 Last week I went on a baking spree. The house was clean on Monday, and I mean SPOTLESS and by the end of the week it was trashed. LOL. I made bread (honey wheat bread is our staple around here, I make our bread from scratch. It's delicious) and then I made cinnamon rolls from scratch for the first time ever. Unfortunately, they didn't go over well. This was mostly because I think the recipe that I got from allrecipe.com wasn't all that. There HAS to be a better recipe. They weren't bad, but they weren't awesome, and I strive for AWESOME. So, if any of you have a great homemade cinnamon roll recipe to share, I am ALL ears and would be eternally grateful! They did LOOK good though!


I long for the day when I can cook, bake, and do canning and prep work in a real kitchen. It doesn't have to be huge, but seriously, I am really really struggling here. The counter space I have is pretty much ZERO and there is no table or place to cool pies, cakes, cookies, or breads, not to mention to actually roll out cookies or anything like that. I have to go out to the dining room to do that, which means that the table has to be clear, remain clear, and that I have to keep the kids off it, as well as then having the issue of where to FEED them when I am working on the table. We don't have enough cupboard space, let alone SPACE period, and my oven was $25 at an auction 10 years ago... and I bought it from a little old lady going to a nursing home... who KNOWS how long she had it. I have recently noticed that burners aren't as hot as they used to be, and the oven itself isn't wonderful. I can only imagine what I could do with a new oven and some counterspace. Here is an example of what my kitchen looks like after I bake bread and cinnamon rolls. It was spotless, and then, in less than 2 hours, it looks like this....

 That little "L" of counter space is all I have, and half of that is the sink and the dish drainer.Add two kids clinging to your legs, laying on the floor, and or "helping" and it gets pretty hairy at times. I am very glad that when we got married I used money I received from my bridal showers to buy my hutch and pantry for the kitchen. Without them, I would be a crazy woman.
After I got the baking out of my system, I moved on to laundry and sewing. Actually I was doing laundry the week before too. It never ends. But this week I can't even begin to tell you how many loads of laundry I have done. TODAY alone I have folded 2 loads of diapers and a load of whites from earlier in the week, AND washed six loads, two of which have already been folded. the dryer isn't having an easy time keeping up with the washer (you know how THAT goes) so I have a two loads waiting for the dryer and one drying right now. Oh wait, I actually did seven loads, because I washed more FABRIC (yeah!) I started the sewing bug by cleaning the porch. It badly needed it. I reorganized the kids' play area and once that was done, I set in to find my sewing table again. Here are a few pics of the kids' area of the porch, all cleaned up. We had gotten a new play mat that has roads and such all over it, and so I put that down and they loved driving the people all over it in their cars, and putting the animals in the zoo, etc. I put the tree play tent away for a while.


 After I got the porch cleaned, and my sewing table found, Marek found a new love for Ardyn's trampoline. It is like his new "throne." Tuesday afternoon he took his nap on the trampoline, and he also spent every waking moment he could either sitting on it, laying on it, or investigating it.


 Wednesday he took TWO naps on it (yes seriously, both naps on the trampoline) and he LOVED sitting on it. He took his sippy cup, his blankie, and his pacifier up on it, and just hung out there. He only moved to eat and get his diaper changed. Really. Today he again hung out on the trampoline, and took his telephone up there with him. He has recently started saying "hi" and also putting phones up to his ears. He says Mamma much more frequently and *usually* on demand, and yesterday he took his first unassisted steps, hands free, towards Daddy. Exciting!


 In fact, yesterday BOTH kids slept on the porch for their later naps, while I sewed. It was sweet and peaceful.
Tuesday I made lots of baby legs, which are great because BOTH kids still fit the homemade ones. In fact today Ardyn had a mismatched pair on her arms. LOL. She's just a little fashionista.


 Then I moved on to Pajama Dresses. Ardyn is ADDICTED to pajama dresses. She had one last summer and she asked to wear it EVERY Night. It was a horrible dramatic situation whenever it was dirty. I found a winter one with fleece and long sleeves at a resale shop, and bought that for the winter. She had only one all winter, and would sometimes get so upset when it was dirty that she would remind me during the day to wash it so she could wear it that night. Sometimes she refused to take it off all day, hoping to keep it in sight so she could sleep in it again. I bought a pattern that was pretty inexpensive through an online mamma co-op and had plans to make some myself. I finally got around to it! I had already traced the pattern onto tracing paper and cut the pattern out, and the fabric was prepped... I made her a Scooby Doo pair and then a Dora pair, and she is so thrilled with them she wore both of them all day the past two days and at night too. I made them shorter and sleeveless, like tank top dresses, so that they would last all summer. She was so happy that I went out and got more fleece at 50% off at Joann's last night so I can now make her 4 more pair. I shouldn't have to buy her any summer jammies, and making my own is SO much less expensive. It costs me less to make my own than it does to buy them at the resale shop! If I get the fabric at 50% off, it's like $3 a yard, and it doesn't even take a full yard to make a pair. Of course most people would say that the fabric isn't flame resistant and therefore isn't approved for children's sleepwear, but I HATE that flame resistant fabric. I hate how fast it wears and gets pilly and then it sticks to itself in the dryer, and honestly, I am not keen on the idea of putting chemical laden flame retardant fabrics on my little ones. Lots of people don't even have their kids WEAR pajamas to bed... and used pajamas have likely been washed enough to loose their retardant status. At least homemade and used ones make me feel more comfortable. Here's a little reading if you want to be a little freaked out.
The pattern calls for lace at the neck and arms, so I robbed a bit of green lace from an old chemise-style pajama that I had in my "recycle" bin. It was nice and soft from years of use and washing and I thought it might be tolerable around the neckline. It also makes me happy to reuse pretty things :)


 Okay, I will end this post here! Stay tuned to the next post, which if I remember, whill include info on the great toy organization of 2010, and also some pics of what I am up to sewing next! OOOH and the dresser project! I have pics of that too! Just wait till you see what we're up to!
XOXO, Thanks for reading!
Meagan
So, what have we been up to lately? I could write all night. Let's see if I can hit a few high points and make some progress. Forgive me if I repeat myself.
I recently decided to grow my own sprouts. A recent article in Mary Jane's Farm magazine reminded me of the days when we used to grow sprouts at home, in mason jars with rubber bands and cheese cloth as strainers. I have always loved sprouts, especially on sandwiches and salads, and then there was the whole "sprout scare" that wasn't nearly as much of a "scare" as it was made out to be. I still bought sprouts, but they are so expensive, and really you can most trust freshness and quality when you grow them at home. I had kinda forgotten about it, and then this article talked about how Mary Jane recycles plastic vegetable cartons (think berries and strawberries from the store) to make portable and giftable sprouting trays. I just happened to have a stack of them around, and so I was intrigued. She recommended sproutpeople.com for organic and wonderful quality seeds and supplies, and I thought I would start some online research. When I stopped by sproutpeople.com, I was absolutely blown away by their selection, and their up front honesty and information about various mixes and supplies. I ordered a kid's sprouting kit, which was inexpensive and came with a really cute magnifying glass and a nice starter assortments of seeds, as well as a cool sprouter with two clear stackable trays, so you could really SEE the sprouts' progress. I decided that after my first batch, I would try to involve Ardyn and eventually Marek in the process. Ardyn is really starting to be a salad fan, and I know from experience that she is more likely to eat something that she has helped grow and/or prepare. After helping me chop veggies, she really did start eating them more frequently.
I also bought a Mother's Mix of seeds that includes delicious favorites that are high in folic acid and other nutrients, and also has fenugreek to support a healthy milk supply. (yay! how cool is THAT?!) And for good measure (and since they were inexpensive and I was already paying for shipping) I bought the assortment of stainless steel mesh lids for mason jars, so I could sprout the old fashioned way if I wanted to. They say that mason jars require more work to rinse, and I don't think the air circulation is as great in the jars, but at the same time, they are easier to shake and dance with for draining and straining than my trays. I don't like how once the sprouts start to "sprout" they start to clump and it's hard to get them separated in the trays. The directions for the sample bean mix told me to put the entire bag of beans into one of the clear trays. that seemed a little excessive to me, and I thought I would probably do better making half of them at a time (they would last me a long time) and I wasn't sure HOW they were possibly going to sprout being so cramped. So I divided the bag in half and put half in each tray. That worked better, but as they sprouted they still took up the whole tray. I think if it were up to me, for better air circulation and drainage, I would put even fewer in the tray at a time. But I was very pleased with the information that was sent with the kit, the directions, educational information on seeds and sprouting, and some really cool recipes and ways to prepare and enjoy each type of mix that I bought. I am so excited to try them. Here are some pics of the kit and my order, and then a pic of the first crop of sprouts from the Beanies Awesome Mix, which I tried first, mostly because they intrigued me (I have a new thing about beans, just ask me sometime!) and the recipe for eating it fried on top of rice or noodles, or making Beanies Awesome Sprouted Bean Burgers has me all excited!


 Last week I went on a baking spree. The house was clean on Monday, and I mean SPOTLESS and by the end of the week it was trashed. LOL. I made bread (honey wheat bread is our staple around here, I make our bread from scratch. It's delicious) and then I made cinnamon rolls from scratch for the first time ever. Unfortunately, they didn't go over well. This was mostly because I think the recipe that I got from allrecipe.com wasn't all that. There HAS to be a better recipe. They weren't bad, but they weren't awesome, and I strive for AWESOME. So, if any of you have a great homemade cinnamon roll recipe to share, I am ALL ears and would be eternally grateful! They did LOOK good though!


I long for the day when I can cook, bake, and do canning and prep work in a real kitchen. It doesn't have to be huge, but seriously, I am really really struggling here. The counter space I have is pretty much ZERO and there is no table or place to cool pies, cakes, cookies, or breads, not to mention to actually roll out cookies or anything like that. I have to go out to the dining room to do that, which means that the table has to be clear, remain clear, and that I have to keep the kids off it, as well as then having the issue of where to FEED them when I am working on the table. We don't have enough cupboard space, let alone SPACE period, and my oven was $25 at an auction 10 years ago... and I bought it from a little old lady going to a nursing home... who KNOWS how long she had it. I have recently noticed that burners aren't as hot as they used to be, and the oven itself isn't wonderful. I can only imagine what I could do with a new oven and some counterspace. Here is an example of what my kitchen looks like after I bake bread and cinnamon rolls. It was spotless, and then, in less than 2 hours, it looks like this....

 That little "L" of counter space is all I have, and half of that is the sink and the dish drainer.Add two kids clinging to your legs, laying on the floor, and or "helping" and it gets pretty hairy at times. I am very glad that when we got married I used money I received from my bridal showers to buy my hutch and pantry for the kitchen. Without them, I would be a crazy woman.
After I got the baking out of my system, I moved on to laundry and sewing. Actually I was doing laundry the week before too. It never ends. But this week I can't even begin to tell you how many loads of laundry I have done. TODAY alone I have folded 2 loads of diapers and a load of whites from earlier in the week, AND washed six loads, two of which have already been folded. the dryer isn't having an easy time keeping up with the washer (you know how THAT goes) so I have a two loads waiting for the dryer and one drying right now. Oh wait, I actually did seven loads, because I washed more FABRIC (yeah!) I started the sewing bug by cleaning the porch. It badly needed it. I reorganized the kids' play area and once that was done, I set in to find my sewing table again. Here are a few pics of the kids' area of the porch, all cleaned up. We had gotten a new play mat that has roads and such all over it, and so I put that down and they loved driving the people all over it in their cars, and putting the animals in the zoo, etc. I put the tree play tent away for a while.


 After I got the porch cleaned, and my sewing table found, Marek found a new love for Ardyn's trampoline. It is like his new "throne." Tuesday afternoon he took his nap on the trampoline, and he also spent every waking moment he could either sitting on it, laying on it, or investigating it.

 Wednesday he took TWO naps on it (yes seriously, both naps on the trampoline) and he LOVED sitting on it. He took his sippy cup, his blankie, and his pacifier up on it, and just hung out there. He only moved to eat and get his diaper changed. Really. Today he again hung out on the trampoline, and took his telephone up there with him. He has recently started saying "hi" and also putting phones up to his ears. He says Mamma much more frequently and *usually* on demand, and yesterday he took his first unassisted steps, hands free, towards Daddy. Exciting!


 In fact, yesterday BOTH kids slept on the porch for their later naps, while I sewed. It was sweet and peaceful.
Tuesday I made lots of baby legs, which are great because BOTH kids still fit the homemade ones. In fact today Ardyn had a mismatched pair on her arms. LOL. She's just a little fashionista.


 Then I moved on to Pajama Dresses. Ardyn is ADDICTED to pajama dresses. She had one last summer and she asked to wear it EVERY Night. It was a horrible dramatic situation whenever it was dirty. I found a winter one with fleece and long sleeves at a resale shop, and bought that for the winter. She had only one all winter, and would sometimes get so upset when it was dirty that she would remind me during the day to wash it so she could wear it that night. Sometimes she refused to take it off all day, hoping to keep it in sight so she could sleep in it again. I bought a pattern that was pretty inexpensive through an online mamma co-op and had plans to make some myself. I finally got around to it! I had already traced the pattern onto tracing paper and cut the pattern out, and the fabric was prepped... I made her a Scooby Doo pair and then a Dora pair, and she is so thrilled with them she wore both of them all day the past two days and at night too. I made them shorter and sleeveless, like tank top dresses, so that they would last all summer. She was so happy that I went out and got more fleece at 50% off at Joann's last night so I can now make her 4 more pair. I shouldn't have to buy her any summer jammies, and making my own is SO much less expensive. It costs me less to make my own than it does to buy them at the resale shop! If I get the fabric at 50% off, it's like $3 a yard, and it doesn't even take a full yard to make a pair. Of course most people would say that the fabric isn't flame resistant and therefore isn't approved for children's sleepwear, but I HATE that flame resistant fabric. I hate how fast it wears and gets pilly and then it sticks to itself in the dryer, and honestly, I am not keen on the idea of putting chemical laden flame retardant fabrics on my little ones. Lots of people don't even have their kids WEAR pajamas to bed... and used pajamas have likely been washed enough to loose their retardant status. At least homemade and used ones make me feel more comfortable. Here's a little reading if you want to be a little freaked out.

The pattern calls for lace at the neck and arms, so I robbed a bit of green lace from an old chemise-style pajama that I had in my "recycle" bin. It was nice and soft from years of use and washing and I thought it might be tolerable around the neckline. It also makes me happy to reuse pretty things :)


Just to help me keep my sanity, I altered the pattern to use a polyacetal snap instead of a buttoned up back, and added a size tag so that in the future (more daughters?) I am not racking my brain to determine what size this or that actually is :)
And then since the kids were sleeping peacefully on the porch while I sewed, I went ahead and made myself a skirt from a Lila Tueller pattern I had bought (I even had the fabric and charm packs all ready to dive into) and it turned out ADORABLE although it was alot of piecing and a LOT of gathering. Thank god for my Serger!
And then since the kids were sleeping peacefully on the porch while I sewed, I went ahead and made myself a skirt from a Lila Tueller pattern I had bought (I even had the fabric and charm packs all ready to dive into) and it turned out ADORABLE although it was alot of piecing and a LOT of gathering. Thank god for my Serger!


 Okay, I will end this post here! Stay tuned to the next post, which if I remember, whill include info on the great toy organization of 2010, and also some pics of what I am up to sewing next! OOOH and the dresser project! I have pics of that too! Just wait till you see what we're up to!
XOXO, Thanks for reading!
Meagan
Subscribe to:
Posts (Atom)
